画像ユーティリティ
概要
♪the astropy.nddata.utils モジュールは配列操作のための汎用ユーティリティ関数を含む.
2 Dクロッピング画像
スタート
♪the Cutout2D クラスは、2次元配列から切手クリップ画像を作成するために使用することができる。もしオプションの WCS オブジェクト入力は Cutout2D そして、そして Cutout2D オブジェクトには更新されたものが含まれます WCS 裁断アレイに対応しています
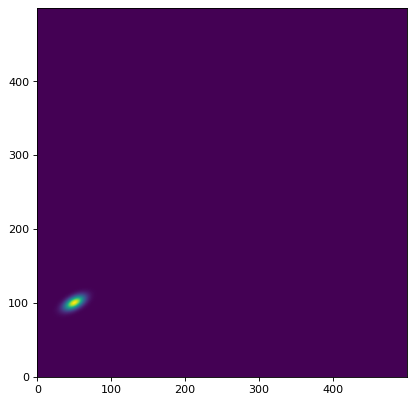
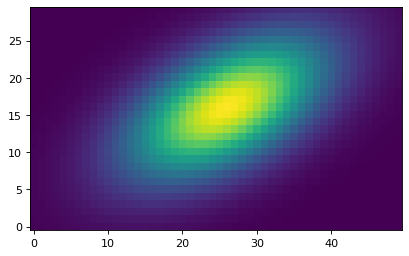
まず、2 Dデータアレイ上で単一の信号源をシミュレートする。複数の信号源をシミュレートしたい場合は、ご参照ください 境界枠付き効率的なモデルレンダリング それがそうです。
注意:ペアリング約束は size そして ポスト もういいよ。位置は(x,y)を指定するが,大きさは(y,x)を指定する.
>>> import numpy as np
>>> from astropy.modeling.models import Gaussian2D
>>> y, x = np.mgrid[0:500, 0:500]
>>> data = Gaussian2D(1, 50, 100, 10, 5, theta=0.5)(x, y)
画像を表示することができます
>>> import matplotlib.pyplot as plt
>>> plt.imshow(data, origin='lower')

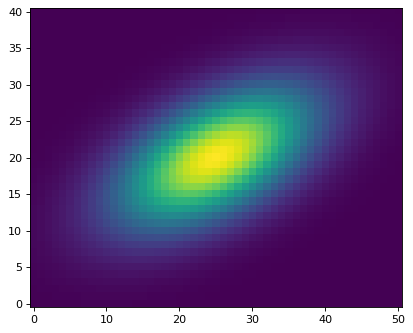
次に、画像中の単一のオブジェクトの切り出しを作成することができる。位置の真ん中に裁断を作りました (x, y) = (49.7, 100.1) その大きさは (ny, nx) = (41, 51) ピクセル::
>>> from astropy.nddata import Cutout2D
>>> from astropy import units as u
>>> position = (49.7, 100.1)
>>> size = (41, 51)     # pixels
>>> cutout = Cutout2D(data, position, size)
♪the size キーワードでもいいです Quantity 対象::
>>> size = u.Quantity((41, 51), u.pixel)
>>> cutout = Cutout2D(data, position, size)
あるいは含まれています Quantity 対象::
>>> size = (41*u.pixel, 51*u.pixel)
>>> cutout = Cutout2D(data, position, size)
正方形のクロッピング画像は、整数またはスカラーを渡すことで生成することができます Quantity **
>>> size = 41
>>> cutout2 = Cutout2D(data, position, size)

>>> size = 41 * u.pixel
>>> cutout2 = Cutout2D(data, position, size)
クロッピング配列は data 属性の属性。 Cutout2D 例を挙げましょうもし…。 copy キーワードは False (デフォルト)、そして cutout.data 原作の一種の観賞になるだろう data 配列していますもし…。 copy=True そして、そして cutout.data 原本のコピーがあります。 data それがそうです。クロッピング画像をお見せしましょう
>>> cutout = Cutout2D(data, position, (41, 51))
>>> plt.imshow(cutout.data, origin='lower')
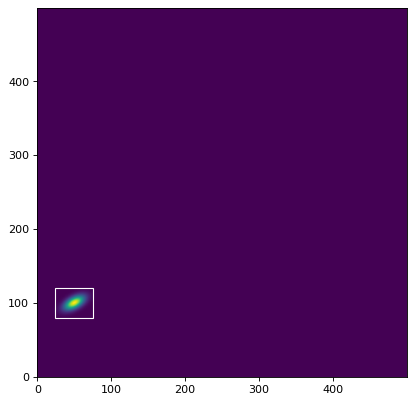
切り出しオブジェクトは、元のデータ上にその境界ブロックを描画することができる。 plot_on_original() 方法:
>>> plt.imshow(data, origin='lower')
>>> cutout.plot_on_original(color='white')

クロッピング配列の多くの属性も属性として格納されている:
>>> # shape of the cutout array
>>> print(cutout.shape)
(41, 51)

>>> # rounded pixel index of the input position
>>> print(cutout.position_original)
(50, 100)

>>> # corresponding position in the cutout array
>>> print(cutout.position_cutout)
(25, 20)

>>> # (non-rounded) input position in both the original and cutout arrays
>>> print((cutout.input_position_original, cutout.input_position_cutout))
((49.7, 100.1), (24.700000000000003, 20.099999999999994))

>>> # the origin pixel in both arrays
>>> print((cutout.origin_original, cutout.origin_cutout))
((25, 80), (0, 0))

>>> # tuple of slice objects for the original array
>>> print(cutout.slices_original)
(slice(80, 121, None), slice(25, 76, None))

>>> # tuple of slice objects for the cutout array
>>> print(cutout.slices_cutout)
(slice(0, 41, None), slice(0, 51, None))
あと2つ Cutout2D 元の配列と切り出し配列との間で画素位置を変換する方法:
>>> print(cutout.to_original_position((2, 1)))
(27, 81)

>>> print(cutout.to_cutout_position((27, 81)))
(2, 1)
2 Dカットモード
There are three modes for creating cutout arrays: 'trim',
'partial', and 'strict'. For the 'partial' and 'trim'
modes, a partial overlap of the cutout array and the input data
array is sufficient. For the 'strict' mode, the cutout array has
to be fully contained within the data array, otherwise an
PartialOverlapError is raised. In all modes,
non-overlapping arrays will raise a
NoOverlapError. In 'partial' mode,
positions in the cutout array that do not overlap with the data
array will be filled with fill_value. In 'trim' mode only the
overlapping elements are returned, thus the resulting cutout array may
be smaller than the requested size.
デフォルトで使用する mode='trim' これにより、切断配列が要求よりも小さくなる可能性がある size **
>>> data2 = np.arange(20.).reshape(5, 4)
>>> cutout1 = Cutout2D(data2, (0, 0), (3, 3), mode='trim')
>>> print(cutout1.data)
[[0. 1.]
 [4. 5.]]
>>> print(cutout1.shape)
(2, 2)
>>> print((cutout1.position_original, cutout1.position_cutout))
((0, 0), (0, 0))
使用 mode='partial' カットは決してしません代わりにいっぱいになります fill_value (デフォルト値は numpy.nan )トリミングがデータ配列に完全に含まれていない場合:
>>> cutout2 = Cutout2D(data2, (0, 0), (3, 3), mode='partial')
>>> print(cutout2.data)
[[nan nan nan]
 [nan  0.  1.]
 [nan  4.  5.]]
注意してください 'partial' モードでは、位置(他のいくつかの属性)が 効き目がある (非パディング)切り出し値:
>>> print((cutout2.position_original, cutout2.position_cutout))
((0, 0), (1, 1))
>>> print((cutout2.origin_original, cutout2.origin_cutout))
((0, 0), (1, 1))
>>> print(cutout2.slices_original)
(slice(0, 2, None), slice(0, 2, None))
>>> print(cutout2.slices_cutout)
(slice(1, 3, None), slice(1, 3, None))
Vbl.使用 mode='strict' 裁断がデータ配列に完全に含まれていない場合、例外が引き起こされる。
>>> cutout3 = Cutout2D(data2, (0, 0), (3, 3), mode='strict')
PartialOverlapError: Arrays overlap only partially.
二次元裁断自 SkyCoord ポスト
入力 position 指定することもできます SkyCoord この場合には WCS 相手は通過しなければならない wcs キーワード。
まず私たちは SkyCoord 役職とa WCS 私たちのデータのオブジェクト(通常あなたのFITSタイトルから):
>>> from astropy.coordinates import SkyCoord
>>> from astropy.wcs import WCS
>>> position = SkyCoord('13h11m29.96s -01d19m18.7s', frame='icrs')
>>> wcs = WCS(naxis=2)
>>> rho = np.pi / 3.
>>> scale = 0.05 / 3600.
>>> wcs.wcs.cd = [[scale*np.cos(rho), -scale*np.sin(rho)],
...               [scale*np.sin(rho), scale*np.cos(rho)]]
>>> wcs.wcs.ctype = ['RA---TAN', 'DEC--TAN']
>>> wcs.wcs.crval = [position.ra.to_value(u.deg),
...                  position.dec.to_value(u.deg)]
>>> wcs.wcs.crpix = [50, 100]
今私たちは SkyCoord 位置和 wcs 対象::
>>> cutout = Cutout2D(data, position, (30, 40), wcs=wcs)
>>> plt.imshow(cutout.data, origin='lower')
♪the wcs 属性の属性。 Cutout2D 対象には現在伝播されたものが含まれている WCS 配列を裁断するために用いられる。配列を裁断することで所定の画素の空座標を見つけることができますご注意ください、私たちは使用する必要があります cutout.wcs 切り出し位置の対象:
>>> from astropy.wcs.utils import pixel_to_skycoord
>>> x_cutout, y_cutout = (5, 10)
>>> pixel_to_skycoord(x_cutout, y_cutout, cutout.wcs)
<SkyCoord (ICRS): (ra, dec) in deg
    ( 197.8747893, -1.32207626)>
元のファイルに対応する画素を見つけました data アレイとその空の座標:
>>> x_data, y_data = cutout.to_original_position((x_cutout, y_cutout))
>>> pixel_to_skycoord(x_data, y_data, wcs)
<SkyCoord (ICRS): (ra, dec) in deg
    ( 197.8747893, -1.32207626)>
案の定、空の座標は原図の中にあります data 裁断アレイもこれに同意しています
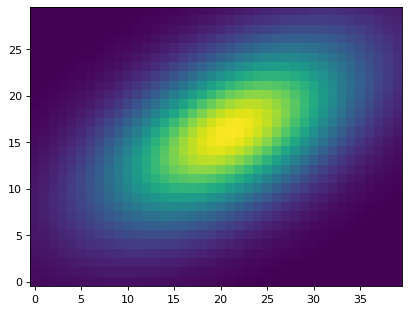
角度を用いた2次元切り出し size
入力 size 指定することもできます Quantity 角度単位(例えば、度、角分、角秒など)で表される。本例では1つは WCS 相手は通過しなければならない wcs キーワード。
この例ではデータを使います SkyCoord 位置、そして wcs オブジェクトは、サイズ1.5 x 2.5角秒の切り出しを作成します。
>>> size = u.Quantity((1.5, 2.5), u.arcsec)
>>> cutout = Cutout2D(data, position, size, wcs=wcs)
>>> plt.imshow(cutout.data, origin='lower')

更新されたWCSを使用してFITSファイルに2次元クロッピングを保存する
A Cutout2D オブジェクトは,切り出し領域の更新WCSオブジェクトを含む協調ファイルに保存することができる.本例では、FITS例画像をダウンロードし、切り出し画像を作成した。ここから生まれたのは Cutout2D そして,切り出し領域の更新されたWCSを含む新たなFITSファイルにオブジェクトを保存する.
# Download an example FITS file, create a 2D cutout, and save it to a
# new FITS file, including the updated cutout WCS.
from astropy.io import fits
from astropy.nddata import Cutout2D
from astropy.utils.data import download_file
from astropy.wcs import WCS


def download_image_save_cutout(url, position, size):
    # Download the image
    filename = download_file(url)

    # Load the image and the WCS
    hdu = fits.open(filename)[0]
    wcs = WCS(hdu.header)

    # Make the cutout, including the WCS
    cutout = Cutout2D(hdu.data, position=position, size=size, wcs=wcs)

    # Put the cutout image in the FITS HDU
    hdu.data = cutout.data

    # Update the FITS header with the cutout WCS
    hdu.header.update(cutout.wcs.to_header())

    # Write the cutout to a new FITS file
    cutout_filename = 'example_cutout.fits'
    hdu.writeto(cutout_filename, overwrite=True)


if __name__ == '__main__':
    url = 'https://astropy.stsci.edu/data/photometry/spitzer_example_image.fits'

    position = (500, 300)
    size = (400, 400)
    download_image_save_cutout(url, position, size)